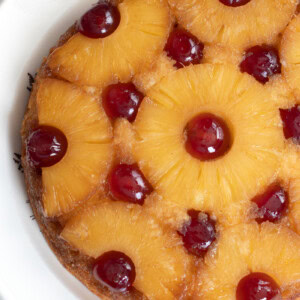
Upside-down Pineapple Cake
A stunning cake, with the perfect tropical flavour. Upside-down Pineapple Cake is a true showstopper!
PRINT RECIPE
Servings: 8 slices
INGREDIENTS
- 40 g Soft Light Brown Sugar
- 40 g Block Margarine or Butter (at room temperature)
- 4-5 Tinned Pineapple Slices (tinned - in juice)
- Glacé Cherries (halved)
- 110 g Caster Sugar
- 110 g Soft Margarine (or Butter) (at room temperature)
- 2 Free-range Eggs (at room temperature; see Egg Size notes below)
- 110 g Self-raising Flour (see Self-raising Flour note below)
EQUIPMENT
- 18cm (7 inch) Sandwich Cake Tin
INSTRUCTIONS
- Preheat your oven to 180°C (160°C for fan-assisted ovens, Gas Mark 4 or 350°F) and generously grease a 18cm (7-inch) cake tin with some extra butter/margarine.
- In a small bowl, mix together the brown sugar with the 40g of butter/margarine. Evenly spread the mixture to the bottom of your pre-greased cake tin.Take your pineapple rings and gently pat the excess juice off them with a clean cloth. Arrange the pineapple as desired on the bottom of your tin (on top of the sugar/butter mixture). Place half a glace cherry in the middle of each pineapple slice and in any gaps around that you think need filling.Set aside.
- In a large bowl, cream together the caster sugar and 110g of butter/margarine until light and fluffy in both colour and texture.
- Add the eggs one at a time, mixing each one through before adding the next. Sift in the flour and gently fold to create a batter.
- Spoon the batter into your prepared tin, on top of your pineapple slices, spreading evenly to the edges. Bake in your preheated oven for 20-30 minutes, until risen, golden and a skewer inserted comes out clean.
- Allow the cake to cool in its tin for a short while. To remove from the tin, run a knife around the edge to loosen the cake from the sides. Next, place a plate on top of the cake before flipping over - the cake should fall out of the tin and onto the plate, but you might need to give it a tap if it is being stubborn.
- Enjoy while still warm with a scoop of ice cream.
IMPORTANT NOTE:
All my recipes are developed using a digital scale and the metric system (grams and millilitres). Cup measurements are available as a conversion but these, unfortunately, won't always be as accurate. For best results, I always recommend baking with a digital scale.
RECIPE NOTES:
Egg Size: When it comes to eggs, I always buy mixed-weight free-range eggs. Generally, egg size doesn't make a huge difference in most baking, unless you are using sizes that lean towards the extremes. If you're unsure which eggs to use, I recommend medium eggs in the UK, which are roughly equivalent to large eggs in the US. That's what this recipe has been tested with.
Self-raising Flour: Don't have self-raising flour? For this recipe, simply whisk together 110g (¾ cup + 1 tbsp) plain flour and 1½ teaspoons baking powder instead. If you bake regularly, you can also make a larger batch to keep in your baking cupboard. For full instructions, cup conversions and answers to common questions, see my Self-raising Flour Ingredient Guide.
Tried this recipe?
Tag @bakingwithgranny or use the hashtag #bakingwithgranny!